To survive is to continue to live or exist despite dangerous or life-threatening situations. Many circumstances could threaten the survival of a person or a group of people.
Some of these include dire socio-economic situations and war. It could also be sudden, unexpected situations, such as being shipwrecked or stranded on an uninhabited island, lost in a desert, or cold, isolated Arctic regions or dense forests.
Looking at these various scenarios, it is clear that one would most certainly need somewhat different skills to survive in each one.
Therefore, survival skills must be discussed in terms of the scenario to which they apply. These include physical and economic survival skills.
Natural disasters can strike seemingly any time and often with little warning. Today, the world, specifically the U.S., is facing disaster after disaster.
Can we even keep count anymore? It's time to be prepared and know how to survive a natural disaster -- before a truly catastrophic disaster strikes.
Survival Skills and Techniques During Disaster

1. Securing a Suitable Campsite
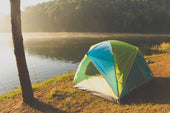
Selecting a comfortable and suitable campsite for your tent or shelter is essential, whether camping in a designated area or stealth camping in a natural, unprepared location.
Locate a suitable site for camping. You will need to avoid spots with natural dangers like insect nests and places prone to being flooded. The easiest and most convenient way to choose a campsite is to look for an existing site.
A good campsite should be close to water, but not too close. By camping close to a water source, you get the convenience of a lighter pack (you don't have to carry all that water).
Avoid camping beneath the tallest trees. Weather can change quickly (depending on your area), and camping beneath tall trees during a storm is not smart.
Look for trees with suitable branches for hanging your food. Bears are around… and if you have food, they want food.
2. Building a Shelter or Debris Hut
Build a suitable shelter to protect you from cold and precipitation. When you finally realize you've lost your way and need shelter, take a deep breath and look around.
A quick scan will reveal how much protection you need to survive in the terrain. Check out what plant material is readily available to make a debris hut.
You'll need solid structural and insulating materials. Look for a long, sturdy pole to form the backbone of your hut.
To form the structure's ribs, you'll need more wood. Gather as many dead leaves, pine needles, dry grass, and moss as possible.
Shrubs and green boughs that you can break off low-lying branches of trees are welcome, too.
3. Starting a Fire from a Small Battery
A small battery and fine steel wool can start a fire. When the battery terminals are bridged with the steel wool, a spark instantly forms in the steel wool.
How does it work? The basic principle is that you need enough "electrical current" flowing through the steel wool to get it hot enough to "light." If the steel wool is too "thick" (strands are too large in diameter), then there isn't enough "resistance" in the strands.
In that case, you are just discharging the battery and not causing a fire. A nine-volt battery is great because it has a high voltage and close terminals.
You can ignite steel wool with a 2-cell flashlight by removing the "end" of the flashlight and brushing the steel wool against the contacts. The best route is to get an assortment of steel wool and batteries and then play for a while.
Soon, the optimal combinations might become pretty obvious.
4. Building Up Your Fire
Although fire is not directly a survival need, it is one of the most useful basic survival skills. It can help warm one's body or shelter, dry clothes, boil water, and cook food.
Fire can also provide psychological support in a survival situation, creating a sense of security and safety. Build your fire using dry, easily flammable materials like leaves and twigs.
There are four key ingredients: a tinder bundle of dry, fibrous material (cotton balls covered in Vaseline or lip balm are an excellent choice if you have them) and wood in three sizes: toothpick, Q-tip, and pencil.
Use a forearm-sized log as a base and windscreen for your fuel. When the fuel is lit, stack the smaller kindling against the larger log, like a lean-to, to allow oxygen to pass through and feed the flames.
Add larger kindling as the flame grows until the fire is hot enough for bigger logs.
5. Finding a Drinkable Water

If you're resourceful and know where to look, you can find or collect good drinking water in just about any environment on Earth. Find drinkable water.
Your ability to distinguish between clean and unclean water will be critical here. Avoid stagnant water or water in the same spot for a while. Snow, dew, and rainwater are good for drinking.
Here are some resorts on where and what kind of water you'll drink is safe.
-
Clear, flowing water is your best option, as the movement prevents bacteria from festering. Small streams should be your first choice. Rivers are acceptable, but larger ones often have a lot of pollution from upstream. Lakes and ponds are okay, but they're stagnant, which increases the chance of bacteria.
-
Collecting and drinking rainwater is one of the safest ways to get hydrated without bacterial infection. This is especially true in wild, rural areas (in urban centers, the rain first travels through pollution, emissions, etc.). One method to collect is to tie the corners of a poncho or tarp around trees a few feet off the ground, place a small rock in the center to create a depression, and let the water collect.
-
Collect heavy morning dew. Are you looking for a way to collect up to a liter of water per hour? Tie some absorbent cloths or tufts of fine grass around your ankles, and take a pre-sunrise walk through tall grass, meadows, etc. Wring out the water when the clothes are saturated, and repeat. Just be sure you aren't collecting dew from any poisonous plants.
6. Identifying Edible Plants
Be able to differentiate between edible and non-edible plants. Going after big animals is a costly waste of valuable time. Instead, go for the little things that are easily available, such as small rodents, reptiles, and plants.
It would be best to buy books that tell you about edible and non-edible plants in different environments and memorize them. Here are a few plants which are abundant throughout North America:
Cattail: known as the "supermarket of the swamp," the roots, shoots, and pollen heads can be eaten
Conifers: the inner bark, known as the cambium, is full of sugars, starches, and calories and can be eaten on most evergreen, cone-bearing trees
Grasses: the juices from the leaves can provide nutrition, and the root corn can be roasted and eaten
Oaks: all acorns can be leached of their bitter tannic acids and then eaten, providing an excellent source of protein, fats, and calories.
Be sure to properly identify any plant you plan on consuming (using field guides and the guidance of an experienced expert).
Many plants can be difficult to identify, and some edible plants have poisonous look-a-likes. If you cannot identify the plant, do not eat it.
7. Making and Using a Multi-pronged Spear
Learn how to make and use a multi-pronged spear with wood and a knife. This is the easiest way to hunt small game.
Gigging (hunting with a multi-pronged spear) is the simplest way to catch anything from snakes to fish.
Cut down a sapling about an inch in diameter, then split the fat end with a knife (or sharp rock) into four equal sections ten inches down.
Push a stick between the tines to spread them apart, then sharpen the points. You've got an easy-to-use four-pronged spear.
It's much easier for catching critters than a single sharp point.
8. Navigating During the Day
Learn how to navigate during the day using the sun's position or an analog watch to get your general bearing.
On the other hand, regardless of whether you carry a GPS, the ability to interpret a map and navigate with a compass are fundamental backcountry skills that every serious hiker should know.
The key to being a proficient navigator is paying attention. Establishing the habit of keeping track of where you are always means regularly correlating what you see on the map with what you see on the ground.
You can also use an analog watch to find the north-south line. Just hold the watch horizontally and point the hour hand at the sun. Imagine a line running exactly midway between the hour hand and noon.
This is the north-south line. On daylight savings? Draw the line between the hour hand and one o'clock.
9. Navigating During the Night
Find the North Star (Polaris) to learn how to navigate at night. Polaris is at the end of The Little Dippers handle.
By drawing a line between the two stars once you find The Big Dipper and extending this line beyond the Little Dipper, you will find that it aligns with Polaris.
If you then face Polaris, you are facing the true north. If a crescent moon is in the sky, connect the crescent's horns with an imaginary line.
Extend this line to the horizon to indicate a southerly bearing. Once you determine your direction, pick a landmark nearby or in the distance to follow by daylight.
10. Tying a Bowline
It has many uses, such as fastening a mooring line to a ring or a post. Under load, it does not slip or bind, and when not in use, it can be untied easily. Two bowlines can be linked together to join two ropes.
Its principal shortcoming is that it cannot be tied or untied when a load is on the standing end. Therefore, it should be avoided when, for example, a mooring line may have to be released under load.

